Assignment 3
Assignments | | Links:
In this assignment, you will take a further step to explore the usage of different tools provided by SwiftUI, such as @EnvironmentObject, @ObservedObject and more.
Notes: In this assignment, you might have some trouble to make the preview work. One highly possible reason is that you declare a
@EnvironmentObjectin your view and the environment object is supoosed to be passed from ancestor views, but the preview doesn’t have such information. In this case, you may want to pass a@EnvironmentObjectto your preview to make it work.
Stage 1 (55 Pts in total)
Let’s create a settings view!
In this stage, you need to create a model, a view model and a view for the settings view. The settings view won’t be reachable directly in your app by the end of this stage. However, we will link the settings view in the following stages. At that time, you should be able to open the settings view and check the correctness of your implementation in this stage by changing things on the fly.
Stage 1.1 (10 Pts)
In this sub-stage, you need to create a model for settings. You need to create a Swift file named Settings.swift in the folder Models. You can name your struct as Settings.
In this model file/struct, you are required to provide four properties.
var showProgressRing: Bool
You can set the default value totrue. This property will be used to determine whether users want to display the progress bar on theReminderCardView.var showStepsPreview: Bool
You can set the default value totrue. This property will be used to determine whether users want to preview the steps on theReminderCardView.var maxNumOfStepsPreview: Int
You can set the default value to3. This property will be used to determine how many steps users want to preview on theReminderCardViewif theshowStepsPreviewis marked astrue.var welcomeGreetings: String
You can set the default value toWelcome. This property will be used to display the navigation title in the landing view of our app, which is theGroupView.
Grade Breakdown:
- (2 pt) Correctly create the required model named
Settingsin the right folder with the right filename. - (2 pt) Correctly create
var showProgressRing: Boolproperty. - (2 pt) Correctly create
var showStepsPreview: Boolproperty. - (2 pt) Correctly create
var maxNumOfStepsPreview: Intproperty. - (2 pt) Correctly create
var welcomeGreetings: Stringproperty.
Stage 1.2 (10 Pts)
In this sub-stage, you need to create a view model for the Settings model we just created in the previous stage. You need to create a Swift file named SettingsViewModel.swift in the folder ViewModels. The name of your view model/class should be SettingsViewModel.
There are some requirements for this view model.
This view model should be a
class(reference data type) and conform to the right protocol. You need to think about which protocol to conform.In this view model, you are required to provide a variable named
settings, presenting theSettingsmodel we defined in the previous sub-stage. We will use this variable to apply settings to our views later. Namely, this variable will be changed and should be able to notify the UI to redraw them. You need to think about which property wrapper you should use to mark this variable.To let you get familiar with
getterandsetter, you are required to provide four computed variables:var welcomeGreetings: String,var showProgressRing: Bool,var showStepsPreview: Bool,var maxNumOfStepsPreview: Int
These four computed variables bridges four corresponding variables defined in your local
settingsmodel instance. Namely, when you set a value to one of these computed variables inSettingsViewModel, you should use asetterto assign the value to the corresponding variable in thesettingsmodel instance. You should also use agetterto access the corresponding variable in thesettingsmodel instance when accessing one of these computed variables.This step for defining four computed variables is indeed a bit boring and repetitive. However, you may see the view model acts like a middle man to respond to the UI or data changes. Therefore, when things get complicated, you may want to do some additional checkings or logics in the view model when modifying or reading the data.
Grade Breakdown:
- (2 pt) Correctly create the
SettingsViewModelclass in the right folder with the right filename. - (2 pt) Correctly conform to the right protocol for the
SettingsViewModel. - (2 pt) Correctly mark the local
settingsmodel with the right property wrapper. - (4 pt) Correctly define four computed variables with
getterandsetter.
Stage 1.3 (15 Pts)
In this sub-stage, you will use the SettingsViewModel created in the previous sub-stage and reflect the changes of settings on your UI.
Some steps to guide you through (TODO marks are provided in some files too):
- Go to the file
ECS198F003_Assignment3App.swift. Declare a variable namedsettingsVM. Mark it with the right property wrapper.@ObservedObjectvs@StateObject? - Pass this newly declared
settingsVMtoGroupViewas an environment object. - Go to the file
GroupView.swift. Declare an environment object which grabs thesettingsVMview model from the environment as you just injected this view model from the parent view. - Still in the file
GroupView.swift, use thewelcomeGreetingsfrom thesettingsVMto set your navigation title properly. - Go to the file
ReminderCardView.swift. Do something similar to step 3. - Still in the file
ReminderCardView.swift, follow the TODO marks to correctly apply settings to the UI. There are 3 TODO marks.For the step of limiting the number of steps for preview, there is no requirement on how to select which step to preview, as long as you have the correct number. You can just try to use
.prefix(), which is defined on any array by default.
Grade Breakdown:
- (2 pt) Correctly declare the
settingsVMin the top level of your app with right property wrapper. - (5 pt) Correctly grab the
settingsVMfrom the environment for bothGroupViewandReminderCardView. - (2 pt) Correctly apply the welcome greeting based on settings.
- (2 pt) Correctly show/hide the progress ring based on settings.
- (2 pt) Correctly show/hide the step preview based on settings.
- (2 pt) Correctly limit the number of step for preview based on settings.
Stage 1.4 (20 Pts)
In this sub-stage, you will create a view that allow users to adjust the settings in your app.
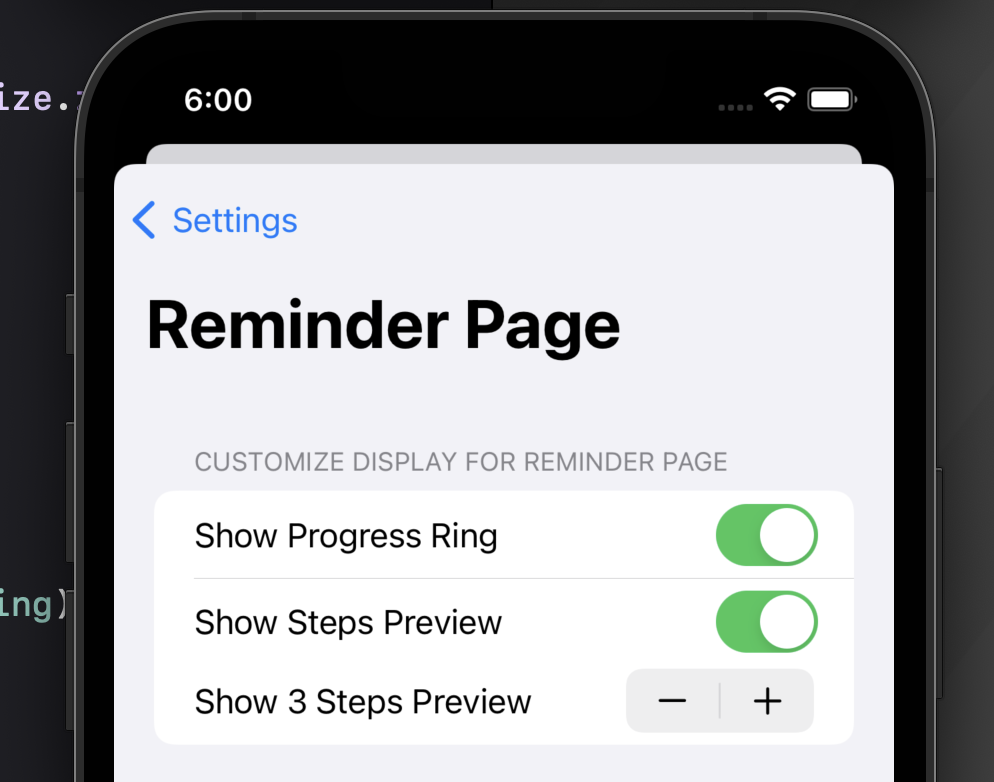
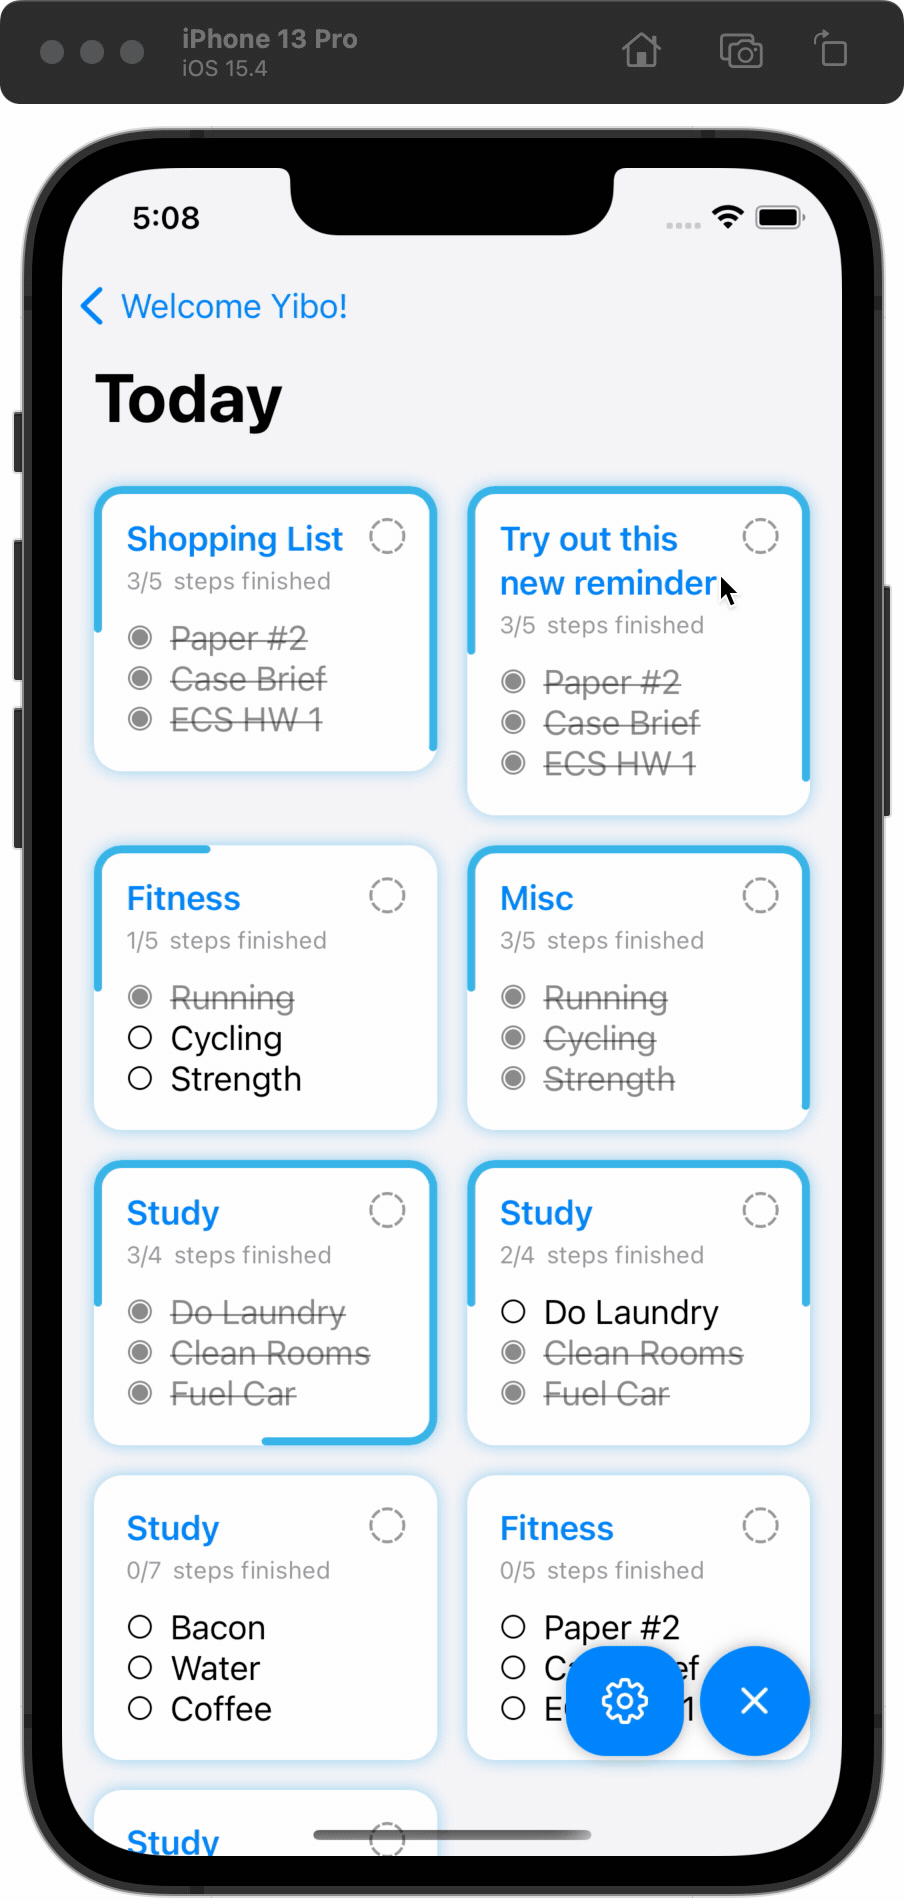
You need to create a SwiftUI file named SettingsView.swift in the folder Views/MainViews. You have the freedom to organize your view code in any way you want, as long as you properly used NavigationView, Form and Section and the final product should be something like this:
| Settings for Welcome Page | Settings for Reminder Page |
|---|---|
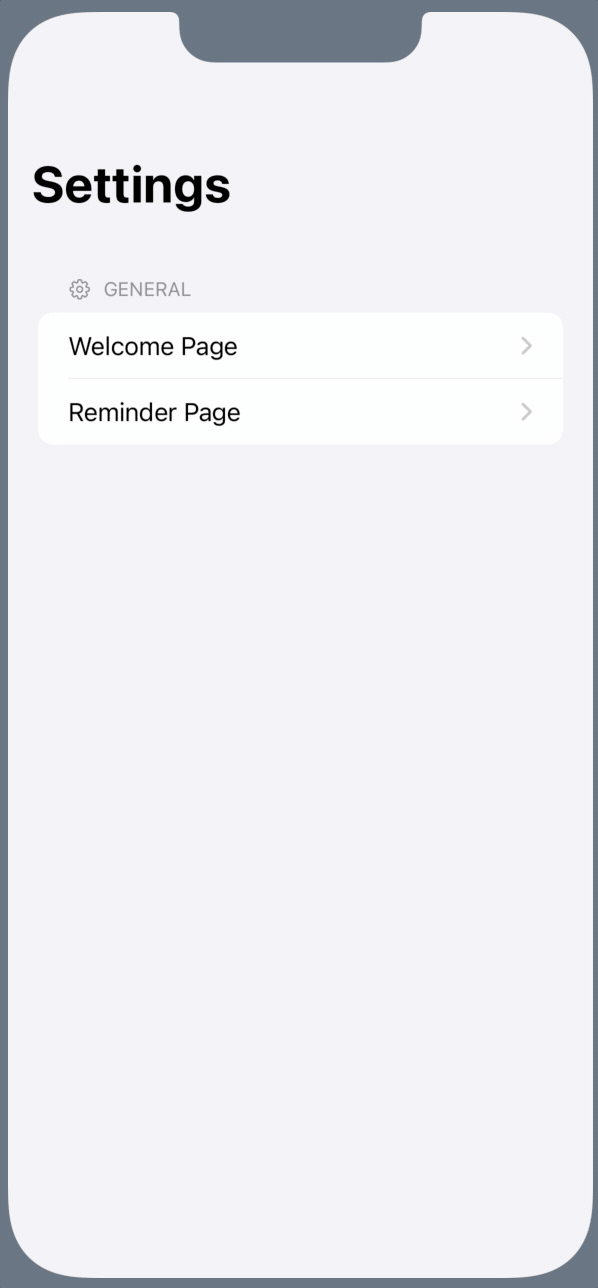 |  |
To achieve the view like this, you may also need to know how to use Toggle and Stepper, which are two built-in views in SwiftUI library. These two things are not covered in the lecture and you need to figure out how to use them on your own. There are lots of built-in views in SwiftUI standard library and we won’t be able to cover them all. Of course, lots of 3rd-party libraries also are out there and we won’t be able to cover them in the lecture. Therefore, it’s quite important for you to know how to pick up things from official documents and code examples online. Some additional resources are provided below.
Toggle
This is an UI element to let users toggle a button. Official Document.Stepper
This is an UI element to let users increase or decrease a value by pre-defined amount. Official Document
Remarks
- You will practice the usage of
Bindingin bothToggleandStepper.- You can limit the range of the
Stepperto 1-5. Namely, we allow the user to display at most 5 steps or at least 1 steps. Of course, users can shutdown the step preview entirely.- You need to hide the view of
Stepperif the user disable the steps preview entirely.- You may have trouble with preview. Do remember to pass an environment object to previews!
- You need to use
TextFieldto allow the user to customize the welcome greeting text.
Grade Breakdown:
- (5 pt) Correctly implement a settings view with the right section header from where the user can go into
Welcome PageorReminderPage. - (5 pt) Correctly implement a welcome page settings view with the right section header from where the user can set the greeting text.
- (5 pt) Correctly implement a reminder page settings view with the right section header from where the user adjust the settings.
- (5 pt) Correctly show/hide the
Stepperwhen the user disables the steps preview entirely.
Stage 2 (15 Pts in total)
Add the flyout action button and link it with your settings view!
In this stage, your goal is to add the flyout action button, which is already created for you, to your view hierarchy. After that, you need to properly set up the settings view so you can open up your settings view right from the action button. After this stage, you should be able to open your settings page from the action button and should be able to adjust the settings by changing the values in the SettingsView. The expected behavior is something like this:
| Open SettingsView | Edit Welcome Greeting | Disable Progress Ring | Modify Step Preview |
|---|---|---|---|
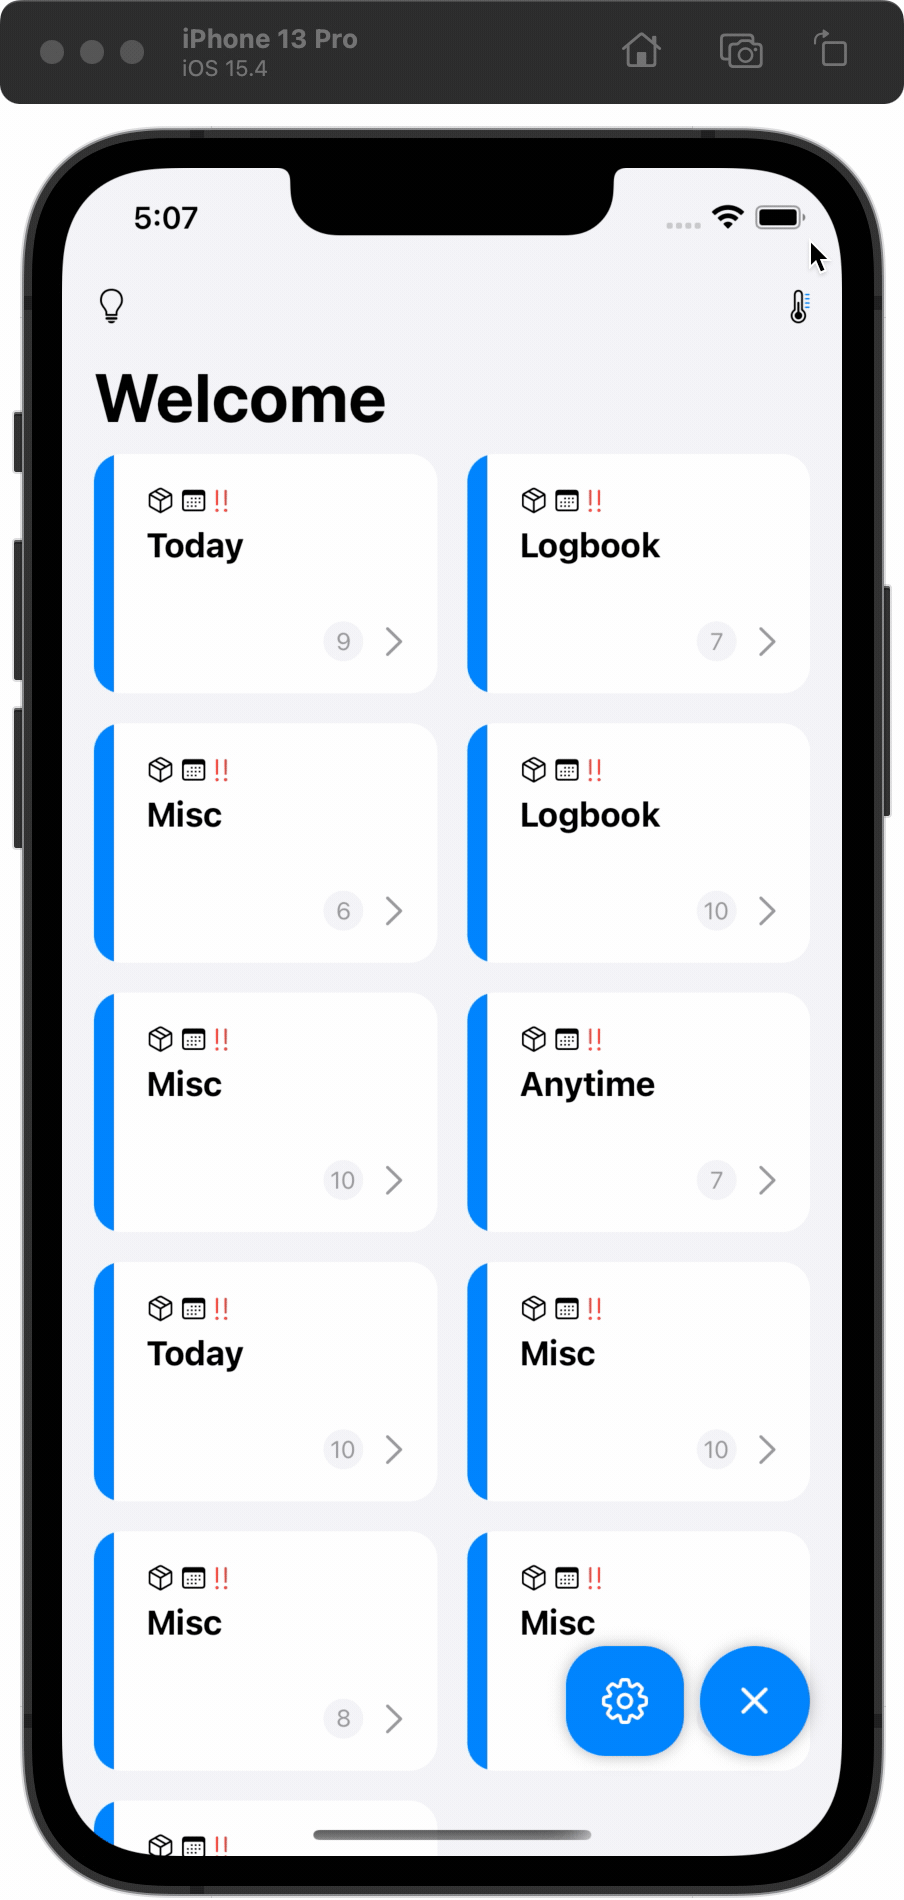 |  |  |  |
Stage 2.1 (10 Pts)
In this sub-stage, you need to declare a ActionButtonViewModel instance in the GroupView and add your ActionButton view to the right place. TODO marks are provided.
ActionButtonViewModel is already defined for your in the file ViewModels/ActionButtonViewModel.
- Go to the file
GroupView.swift, first, you need to declare a variable namedactionButtonVMand its type isActionButtonViewModel. You need to mark this variable with right proper wrapper. Namely,@ObservedObjector@StateObject? - Add the
ActionButtonview to theGroupView. You need to figure out the right place to put theActionButton.
Requirement: theActionButtonshould be always on the top of other UIs, except for theInspirationView. TheActionButtonshould be displayd behind theInspirationViewwhen theInspirationViewis opened.
Grade Breakdown:
- (5 pt) Correctly declare the
actionButtonVMwith the right proper wrapper. - (5 pt) Correctly place the
ActionButtonview according to the requirement.
Stage 2.2 (5 Pts)
In this sub-stage, you will set up a sheet to display the settings view. TODO marks are provided.
Go to the file GroupView.swift. You should apply a .sheet() on the NavigationView. This sheet should take a binding from the isSettingsOpen variable inside the actionButtonVM and present the SettingsView when the isSettingsOpen is true.
Grade Breakdown:
- (5 pt) Correctly use
.sheet()to show theSettingsView.
Stage 3 (20 Pts in total)
In this stage, you will set up the ActionButton to support more functionalities. The expected behavior of this stage should be something like this:

Stage 3.1 (10 Pts)
In this sub-stage, you need to pass the actionButtonVM defined in the GroupView to all subviews as an environment object as we will use the actionButtonVM in some subviews to access or set up the content of the ActionButton. TODO marks are provided.
Steps to follow:
- Go to the file
GroupView.swift. Inject theactionButtonVMto theNavigationViewas an environment object. - Go to the file
ReminderView.swift. Grab theactionButtonVMenvironment object from the environment. Namely, declare an@EnvironmentObject. - Go to the file
DetailView.swift. Grab theactionButtonVMenvironment object from the environment. Namely, declare an@EnvironmentObject.
Grade Breakdown:
- (5 pt) Correctly inject the
actionButtonVMas an environment object inGroupView. - (5 pt) Correctly use
@EnvironmentOjectforactionButtonVMin bothReminderViewandDetailView.
Stage 3.2 (5 Pts)
In this sub-stage, you will set up ActionButtonItems to the ActionButton based on different views you are at. TODO marks are provided.
Actually, all codes for this sub-stage is already provided to you. You just need to uncomment the code and take a careful look at the logic. Try to reason about why these codes works. Just some free points to save you some time.
Steps to follow:
- Locate the function named
prepareMainViewActionButtonItemsin the fileGroupView.swift. Just uncomment the code inside that function. - Locate the function named
prepareReminerViewActionButtonItemsin the fileReminderView.swift. Just uncomment the code inside that function. - Locate the function named
prepareDetailViewActionButtonItemsin the fileDetailView.swift. Just uncomment the code inside that function.
Grade Breakdown:
- (5 pt) Correcly follow the instructions.
Stage 3.3 (5 Pts)
In this sub-stage, you will need to call three functions defined in the previous sub-stage to properly set up ActionButtonItems when the corresponding view appears on the screen. You will practice how to use .onAppear(). No TODO marks is provided for this sub-stage, you need to figure out where to put the .onAppear() view modifier to call the corresponding “prepare action button” function.
Grade Breakdown:
- (5 pt) Have the correctly behavior as the GIF shows. Namely, the
ActionButtonupdates its items accordingly when the view changes.
Stage 4 (10 Pts in total)
Commit, Push, and Submit
Remember to commit your code changes and push the change to GitHub before the deadline.
Even if you intend to use late policy, you still need to submit your repository link on Canvas before the original deadline to receive the 10 points.
Grade Breakdown:
- (10 pt) A valid GitHub repository link is submitted on Canvas before the original deadline.